Adobe Photoshop makes it easy to add shapes to an image: you can draw them using a variety of shape tools, or select from a large assortment of predrawn shapes. You can arrange vector shapes on separate layers for easy modification and overlay effects. In this tutorial, you'll add both background and foreground shapes to an image and create some flair with gradient and layer effects.
1. Open an Image in Photoshop.
Choose File > Open or double-click a thumbnail in the File browser. For this tutorial, you might want to start with an image that has at least two layers. First we'll add shapes to build a more interesting background for the image.
2. Select the rectangle tool.
Select the Rectangle tool from the toolbox. By default, the Shape Layers button in the options bar is selected. Use this option to create a vector shape, which is automatically placed on a new layer. (Adjacent icons in the palette let you create a path or a rasterized shape on the current layer.)
3. Create a rectangle shape.
In the Layers palette, select the bottom layer in your image. Click and drag to create a rectangle covering the right half of the image.The rectangle uses the foreground color by default. To change the color, double-click the layer thumbnail to bring up the color picker and select a new color.
4. Add gradients to a shape.
Now we'll add two more rectangle shapes, this time with gradient effects. Using the Rectangle Shape tool, drag a new rectangle to cover the top left quarter of the image. Click the foreground color swatch and select a new color for this rectangle. Choose Layer > Change Layer Content > Gradient. Leave Gradient at the default selection, Foreground to Transparent. Set Style to Linear and the angle to -50. Repeat these steps to create a second rectangle, this time with an angle of 20.
5. Load custom shapes.
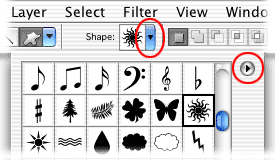
Select the Custom Shape tool in the toolbox. In the options bar, click the down arrow to open the Custom Shape Picker. Click the black triangle to open the palette menu and select All, and then click Append. This loads all of Photoshop's predrawn shapes into the Custom Shapes palette.
6. Draw a custom shape.
Now we'll add a custom shape to the foreground for an overlay effect. Select the top layer of the image, and use the foreground color swatch to select a color for the new shape. Select a custom shape from the Custom Shapes palette. (For our image, we chose the sunburst shape.) Holding down the Shift key to constrain proportions, click and drag in the image to draw the shape.
Since it's a vector shape on its own level, the sunburst is easy to move or resize. Select the layer and then use the Move tool to move the shape, or choose Edit > Free Transform to resize, rotate, flip, or skew it.
7. Fill the custom shape with a pattern.
Next we'll apply one of Photoshop's pattern effects to make our shape more interesting. Select the new shape in the layers palette, and then choose Layer > Change Layer Content > Pattern. Click the pattern in the Pattern Fill dialog box to open the Patterns palette. Click the black triangle to open the palette menu.
The palette menu shows different sets of patterns--Artist Surfaces, Color Paper, Nature Patterns, and so on--that you can add to your basic patterns palette. Select a set, and then click Append. Click a pattern to apply it to the custom shape. To change your shape back to a solid color or to a gradient, choose the Layer > Change Layer Content command again.
8. Add a layer effect to the shape.
To enhance your shape further, you can add layer effects to it. With the shape layer selected, click the Add a Layer Style button. Choose Stroke from the menu. In the Layer Style dialog box, choose settings for the stroke color, width, and position, and then click OK.
Experiment with different blending modes for the layer, such as Hue, Darken, or Multiply, using the mode menu in the Layers palette. To remove a layer effect, select the effect in the Layers palette and drag it to the Delete Layer icon.


0